
Livestreaming is the new zeitgeist of modern businesses. It seems to have seamlessly cracked the code to engage, scale and monetize your audience. From live shopping sprees to fundraisers, it’s everywhere!
As per eMarketer, 41 million online shoppers purchased from livestreams in 2024. You might own a creator community or an e-commerce platform. If you plan to embed livestreams into your website, here’s your ultimate guide!
Here’s what you’ll learn:
- What is embedding a livestream?
- Benefits of embedding live streams
- Best platforms for live streaming
- How to embed live streaming on your website?
- How to embed video streaming on your website?
- Different examples of live-streaming events
- Free or professional streaming software: which is better?
Table of Contents
- 1 What is Embedding a Livestream?
- 2 Advantages of Embedding Live Streaming on Your Website
- 3 Best Platforms for Live Streaming
- 4 How to Embed Live Streaming in Your Website?
- 5 How to Embed Video Streaming to Your Website?
- 6 Different Examples of Live-Streaming on Your Website
- 7 Free Streaming or Self-hosted Video Streaming: Which is Better?
- 8 Wrapping Up
- 9 FAQ-Related to How to Embed Live Streaming into Your Website
What is Embedding a Livestream?
Embedding a livestream means to add a live video to your website with a media player. Hence, the video player appears and streams a live event once the user clicks on it.
You can add both videostream or livestream to your website. Adding a video element to your website drives the engagement and draws in a loyal audience.
You can use free live streaming software like YouTube Live or Twitch Live. Alternatively, you can use professional video hosting platforms to embed your livestreams.
Advantages of Embedding Live Streaming on Your Website
There are tons of popular live-streaming platforms. But why is it great to host videos on your website?
These benefits explain why embedding livestreams in your website makes sense:
-
Authentic Connections
Be it a live webinar, Q&A session, or behind-the-scenes teaser, a live stream pulls in real audience! Streaming on YouTube, Facebook, or Twitch Live means you add a streaming link to your website. However, these popular websites pull in the actual traffic.
-
Monetize Content
Once you add livestream to your website, you are free to monetize it. No third-party limitations or commissions involved. You’re the captain of the ship! Choose from entry tickets, tips, ads, pay-per-view, and sponsorships.
-
Easy Access
Hosting livestreams on your website means — one place for your live videos. Put an end to the endless scrolling of playlists to host replays! Extensive video library — more organized content, hassle-free search.
-
Drive SEO and Brand Visibility
You might already know search engines love videos. In fact, it ranks them way higher on the search page to answer queries people ask.
-
Video Analytics
Have a product or service in the pipeline? Your livestream could offer great insights — user behaviour, demographics, engagement.
Best Platforms for Live Streaming
Live streaming has evolved significantly over the years. And businesses love the reach & engagement that livestreams offer!
Thus, the potential market has attracted several professional video streaming platforms.
Popular Third-party Streaming Platforms
| Platforms | Best For | Pros | Cons |
| YouTube Live | Social media & creators | Free, huge audience, monetize easily | Latency, less customization |
| Facebook Live | Communities | Large user base, interactive | Less monetizable |
| Twitch | Gaming, esports, creators | Monetizable, chats, engagement | Niche-specific, competitive, business-use |
| Kick | Gaming & vlogging | Community-focus, ad-free, high revenue, less strict | Small audience |
| Streamyard | Interviews, social media videostreams, discussions | Multi-streaming, browser-based, branding, user-friendly | Limited customization, integrations & analytics |
| OBS Studio | Broadcasters, streamers, creators | Free, multi-streaming, open-source, RTMP-support | Streaming quality, analytics, no cloud hosting |
Professional Video Streaming Platforms
| Platforms | Best for | Pros | Cons |
| Agora | Education, Gaming, E-commerce | High-quality audio & video, low latency, mult-streaming | Developer support for integration, complex pricing |
| Twilio | E-commerce, Education, Creators | High-quality audio & video, WebRTC support, video insights | No multi-streaming support, limited features, complex, low latency |
| Ant Media | Sports, gaming, video-conferencing & online events | Low latency, adaptive bitrate streaming, customization | Paid, data exposure risk, bandwidth issues |
| Livestream by Vimeo | Private streaming, Enterprise-level | White-label solution, high security | Expensive |
| Wowza | Enterprise-level | Supports major protocols, extensive APIs, adaptive streaming | Latency, lacks built-in monetization, limited security |
💡Note: Ensure RTMP or WebRTC protocol support for low latency experience.
How to Embed Live Streaming in Your Website?
Embedding a live stream to your website sounds a bit technical. But, once you know the essential components, it’s quite straightforward.
Follow these steps to embed a live streaming into your website:
- Decide your platform goals.
- Choose a streaming platform.
- Create a streaming account and configure a new stream.
- Copy the embed code.
- Test, publish & start live-streaming (paste the HTML code).
1. Decide your Platform Goals
Ask yourself: why include live streaming in your website?
Not those vague goals that create some buzz. Find a specific goal that aligns with your business.
Take time to brainstorm; everything else depends on your goal. For example, you can choose the right streaming software aligning with your goals or metrics.
The live-streaming goals for businesses include:
- Drive engagement
- Increase brand awareness
- Generate leads
- Additional revenue
- Expand reach
- Gain audience insights through analytics
Be super-specific to increase the chances of achieving your goals better.
2. Choose a Streaming Platform
There are tons of free streaming platforms like YouTube, Facebook, Twitch, and more.
But, if you desire an ad-free experience and more brand authority, try self-streaming! You’ll find tons of professional software in the market.
Choosing the right streaming platform needs an afterthought.
Consider the following aspects:
- Video & audio quality
- Multi-platform streaming
- Scalability
- Ultra-low latency
- RTMP or WebRTC protocol support
- Monetization options
- Custom branding
- Third-party integrations
- Analytics & reporting with the right metrics
- Customer Support
Take a look at the streaming options available in the previous section.
3. Setting up the Livestreaming Environment
For a smooth and optimized video experience, you need a few essential components.
The key components for live streaming include:
- Camera or video source
- Encoder
- Streaming Protocol
- Media Player
- CDN
- Media Server on Cloud (optional)
If you are offering casual live streaming through YouTube, you don’t need a streaming server. But if you’re planning to monetize your livestreams, you need to store them somewhere. That’s when the need for a media server — kicks in.
This helps to carve a seamless ingestion to last-minute delivery experience!
And, you sure need some technical know-how — to build, manage, and maintain the media server. You will need a server, streaming software, media player, CDN, & DRM.
4. Create a Streaming Account and Configuring Settings
Until now, you’ve decided your streaming software & server. Next, it’s time to configure the streaming software.
The configuration might vary with the streaming software.
Here are the basic steps:
-
- Download & install your preferred software.
- Configure the video and audio settings.
- Choose your output settings — resolution, frame rate,bitrate.
- Get the stream key (App ID & app certificate) for your streaming software.
- Set up your CDN (cloud server to make your platform scalable).
- Decide a media player
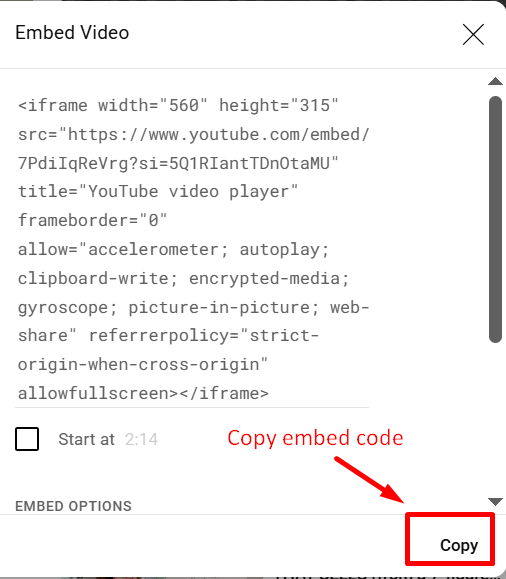
5. Copy the Embed code
Embed code links video content to your website.
You might wonder what this jumbled text means! But, the series of random numbers and words includes actual data. So, go ahead and generate your embed code!
The steps to create the embed code depends on your streaming software. For example, if you are embedding a YouTube, need the video link for your iframe tag. Go to the YouTube video. Click on “share” -> embed. Hit “copy code.”
Voila! You’re done!
6. Test & Publish Your Livestream
Find the place where you want the livestreams. Open your website’s HTML editor. And paste the copied code.
Next, check the audio, video,and overlay to ensure everything is perfect! Lastly, work on the additional configurations – features, monetization, and security.
Yep, that’s all you need to roll in some action and amaze your audience!
How to Embed Video Streaming to Your Website?
Your user’s hard disk space is a scarce resource! Streaming offers convenience and real-time access. Moreover, users don’t need to download the file locally.
Here’s how to embed a video stream into your website:
- Choose a video streaming software like OBS Studio, Streamyard, Restream, Dacast, etc.
- Create a streaming account. Configure the audio and video settings.
- Upload your videos to the streaming platform.
- Get the video’s embed code (iframe tag).
- Add the code into your website.
- Once you paste the embed code, publish the page, and the video player will appear.
Different Examples of Live-Streaming on Your Website
There are a whole lot of scenarios when livestreams can work their magic!
Here are a few examples:
- Live Events – Concerts, Q&As, and AMA sessions are perfect for streaming on your website. Gated events can earn from tickets and pay-per-view.
- Workshops & Educational Sessions – Live webinars like workshops, tutorials, or conferences are informative. Besides, it’s a great branding & retention strategy.
- Product Launch or Feature Updates – Want to spill the beans on a grand product launch or feature upgrade? A live session offering a sneak peek at features or highlights creates much-needed hype!
- Social & Entertainment Events – Host performances, game nights, and award meets to boost credibility.
- Community & Member Spotlight – Perks, rewards, offerings are dopamine boosts for your members! Host virtual meets with member spotlights and accolades to appreciate your audience!
- Fundraisers or Auctions – Support a cause? A live fundraiser or auction could help non-profits to raise money. They could monetize through pledges, tickets, tips, etc.
Free Streaming or Self-hosted Video Streaming: Which is Better?
| Aspect | Free Streaming Platforms | Professional Streaming Platforms |
| Video Quality | Quality with less control | 4K, adaptive bitrate streaming, advanced encoding |
| Ad-streaming | Often monetize from ads | Ad-free videos |
| Customization | Minimal customization – overlays, scene transitions, branding | Customized landing page, video player, polls, clickable social links |
| Features | Basic features | Enterprise-grade features, integration support, interactive |
| Scalability | Limited Audience | Large audience |
| Latency | High-latency | Low-latency |
| Cost | Free to use | Paid subscriptions or one-time purchases |
| Monetization | Ad-based revenue | Subscriptions, pay-per-view |
| Security | Basic security | Encryption, token authentication, DRM |
| Multi-streaming | Needs external support | Native support with paid plans |
Wrapping Up
Livestreaming is a powerful tool to boost your engagement and visibility. Nevertheless, it’s a way to monetize and build your brand!
Don’t miss out on this potential game-changer to build a loyal following. Ready for the next aha moment in the entrepreneurial journey?
FAQ-Related to How to Embed Live Streaming into Your Website
1. How to embed live streaming into your website?
- Choose your streaming platform(YouTube, Vimeo, third-party platform) & video player for your website.
- Get the embed code (iframe or video tag) from your streaming platform.
- Include the embed code in the website; publish the page.
2. What file formats do live streams use?
RTMP, DASH, WebM, HLS, and WebRTC are common file formats for live streaming.
3. How do I test my livestream before going live?
Your testing approach depends on the streaming platform you choose. Here’s how to test before you roll a broadcast:
- Use a record-only feature when you start a broadcast.
- Start a private stream on YouTube Live
- Preview your recording and review your video and audio quality, device functionality, etc.
- Test for different mobile devices, browsers, and screens.